
Asset Designer
Use the DALP Asset Designer wizard to choose an instrument template, configure compliance controls, set initial roles, and deploy a digital asset.
The DALP Asset Designer is the console workflow for creating a digital asset. The wizard starts from a published instrument template, then collects asset basics, template fields, compliance controls, initial roles, and wallet verification.
This guide is for operators using the web interface. If you need to automate the same workflow, use the API guide for asset creation.
The Asset Designer wizard guides you through selecting an asset class, choosing a published instrument template, configuring any template fields, and applying a compliance policy template.
Common use cases: bond issuance, digital equity issuance, fund launch, stablecoin creation, deposit certificates, precious-metal issuance, real-estate fractionalization. Pick the matching entry from the system templates catalog. The wizard attaches required features and metadata fields automatically.
Prerequisites
You need the Asset manager role on the system access manager and a fully onboarded account with a verified identity. Your wallet must be configured for PIN or OTP verification. A published instrument template for the target asset class, backed by a usable token factory, must also be in place.
Asset classes and templates
The Asset Designer uses the asset classes, published instrument templates, and usable token factories configured for your system. DALP shows only asset classes that have at least one usable published template.
If your system has exactly one available asset class, the wizard selects it and starts at template selection.
System configurations commonly group templates into the following classes.
| Asset class | Common templates | Description |
|---|---|---|
| Fixed Income | Bond | Debt securities with maturity dates and fixed payments |
| Flexible Income | Equity, Fund | Variable return assets like shares and investment funds |
| Cash Equivalent | Stablecoin, Deposit | Stable value assets pegged to fiat currencies |
| Real World Asset | Precious Metal, Real Estate | Digital physical assets and property ownership |
If your organization has custom asset classes or templates, use the names and fields shown in your console as the source of truth.
How composition works
An Asset Designer deployment combines four layers:
| Layer | What it decides | When you configure it |
|---|---|---|
| Asset class | The business category shown in the console, such as Fixed Income or Real World Asset. | Select it first so the wizard can show matching published templates. |
| Instrument template | The deployable asset type, required token features, template defaults, and any template metadata fields. | Select it after the asset class. Disabled templates name the missing prerequisite token when one is required. |
| Asset basics and metadata | The asset name, symbol, decimals, jurisdiction, and any template-specific fields. | Complete these before compliance because the selected template and asset type determine which details the wizard needs. |
| Compliance and initial roles | The transfer, holder, minting, redemption, and operational controls applied to the asset. | Configure them before the summary so the final deployment includes both policy controls and the wallets that can operate the asset. |
Follow this order to avoid mixing concepts. The template defines what the asset can be. Metadata describes the specific instrument. Compliance modules decide who may interact with it, and initial roles decide who can operate it after deployment.
Steps
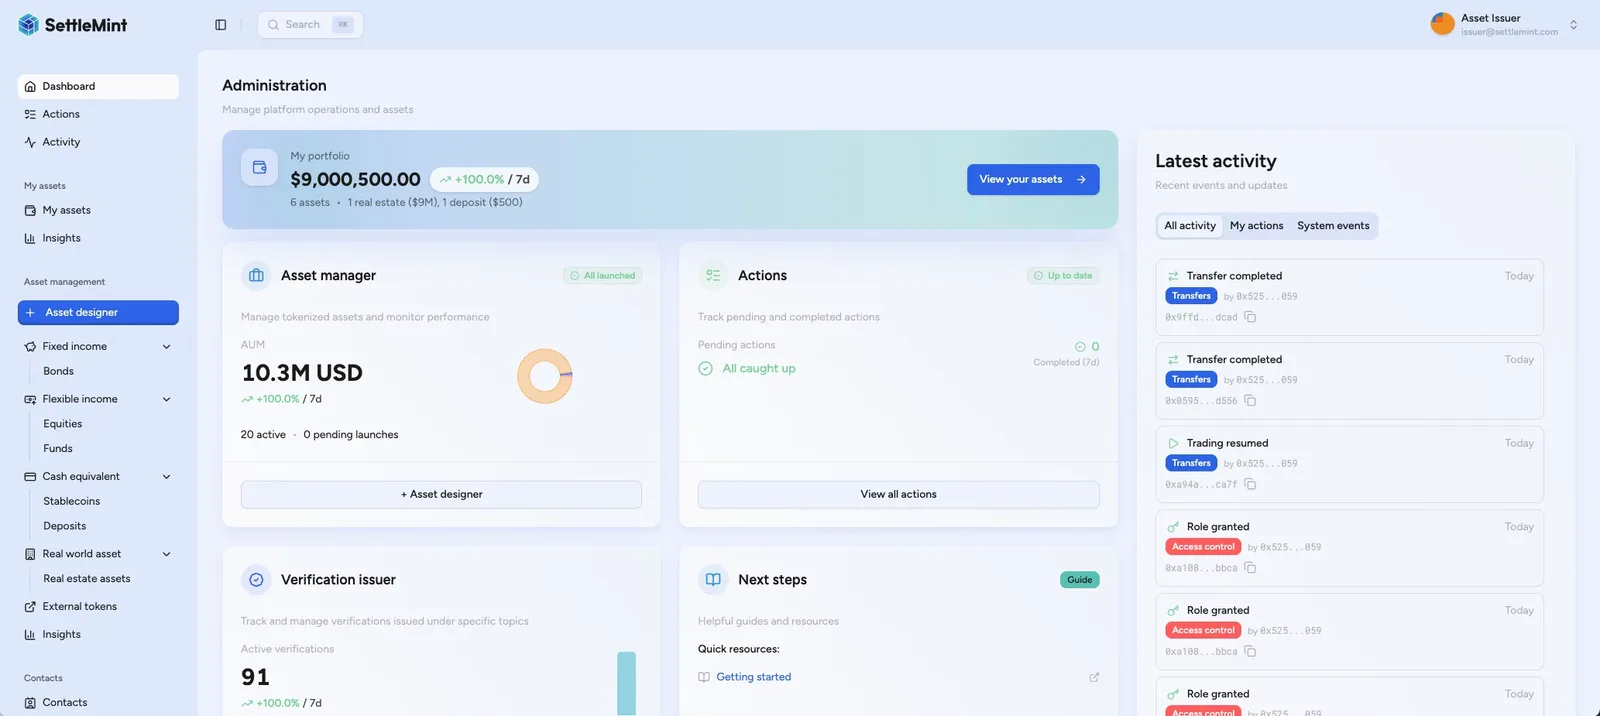
Open the asset designer
Click Asset designer in the sidebar under Asset management to open the wizard. The wizard runs as a routed flow under /asset-designer. Each step has its own URL, so browser Back and Forward move between steps instead of leaving the flow. If you refresh the page while creating an asset, the wizard restores your in-progress values and returns you to the current step in the same browser session.
If you navigate away from /asset-designer after making any progress (choosing an asset class, selecting a template, entering a name or symbol, picking a compliance template, or setting permissions), the platform asks you to confirm before discarding the wizard state. A successful deployment, an in-app leave you confirm, or sign-out clears the saved state.
Select asset class
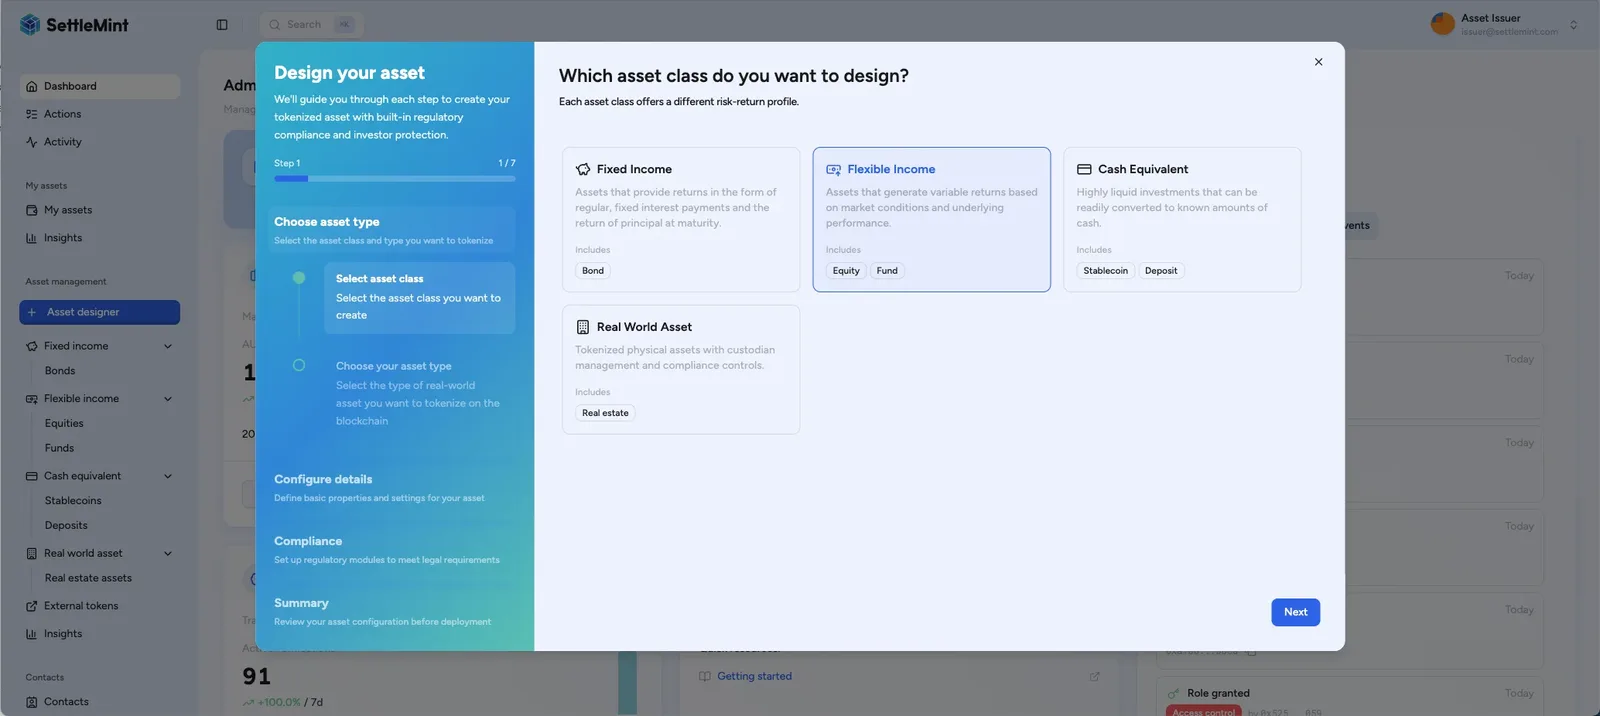
Choose the asset class that matches your security type. DALP shows only classes that have at least one usable published template. Choosing a different class clears the previous template selection, template-specific metadata, and feature inputs so stale values do not carry into the next asset.
Select instrument template
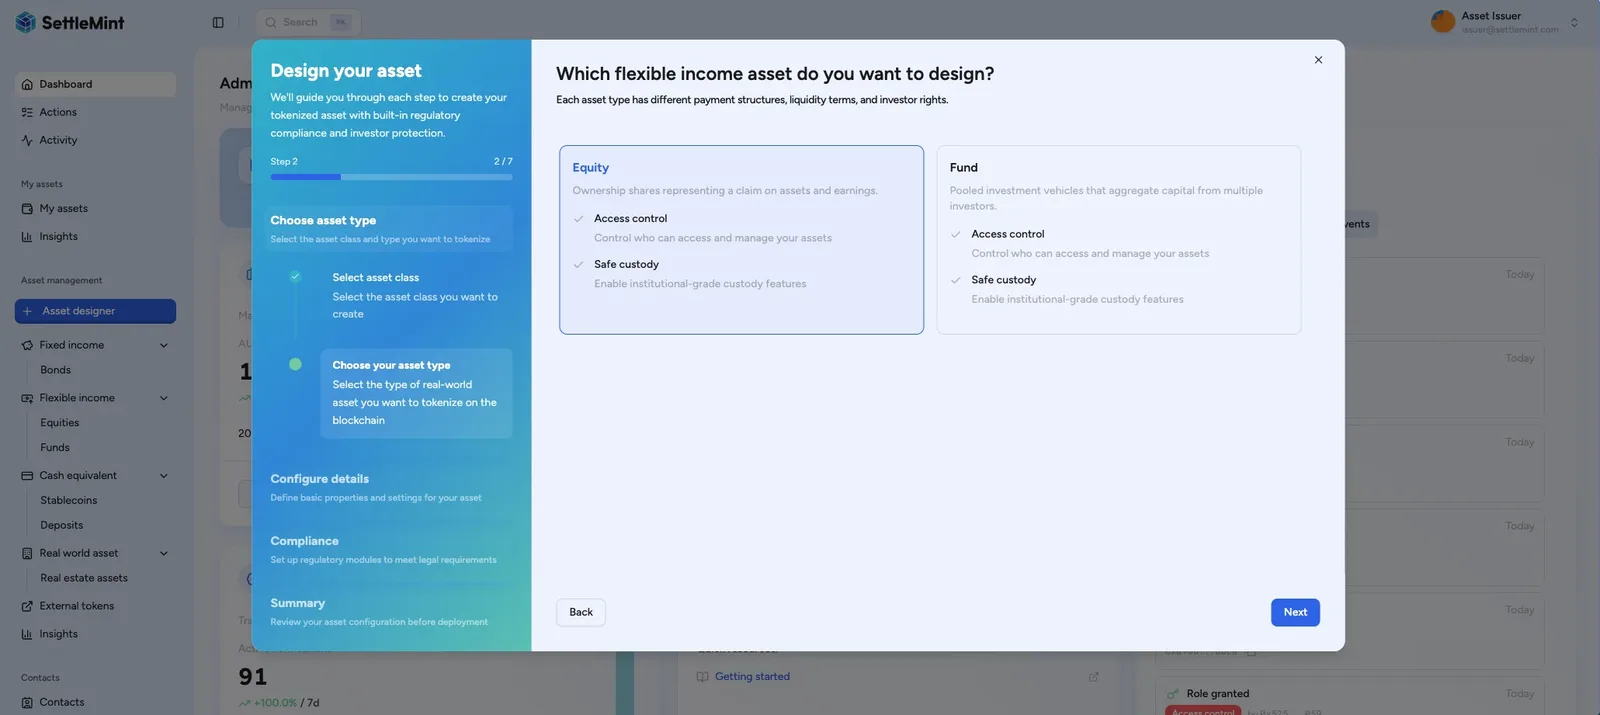
Choose the published instrument template for the asset you want to create. The wizard shows the required features and compliance options attached to each available template. Required features are token behaviors the selected template attaches during deployment, not optional choices you remove during issuance.
If a template needs a prerequisite token that is not available in your tenant, the template card stays disabled and names the missing prerequisite. Use the card button to create the needed token or register an existing external token, then return to the wizard and select the template after the prerequisite is available.
Review template-required features
Instrument templates can include required features. When a template has required features, the Asset Designer shows them as badges during template selection. The deployed asset inherits those token-level behaviors from the selected template, then asks for additional inputs only for the badges that need configuration.
Template-specific fields and defaults
Selecting an instrument template can prefill feature settings and metadata values in the wizard. The Asset Designer clears feature-specific values from the previous selection before applying the new template, so switching templates does not carry old maturity, yield, fee, or conversion inputs into the next asset.
Templates can also add metadata fields to the follow-up details step. These fields can be text, number, date, enum, ISIN, or address inputs. Required metadata fields must be filled before the wizard continues.
Template defaults are applied when you select the template.
For required-feature badges, fields that are fixed by the template can remain hidden while still being submitted with the asset configuration.
Template feature settings that are not part of the template's required features can seed the wizard, but they are not submitted as standalone feature configurations.
Prerequisite tokens
Some required features need an existing token before you can select the template. The table below lists which token each feature checks for and what the wizard shows when it is missing.
| Required feature on the template | Prerequisite checked in the wizard | If it is missing |
|---|---|---|
| Maturity Redemption, Fixed Treasury Yield, or External Transaction Fee | Any ERC-20 token that can act as a denomination or fee asset | The template card is disabled with a "Requires a denomination asset" message. Create or register an ERC-20 denomination or fee asset before selecting the template. |
| Conversion | An equity-class target token | The template card is disabled with a "Requires an equity-class target token" message. Create an equity token or register an existing equity token before selecting the template. |
The prerequisite check looks at tokens and registered external tokens in the tenant. It only decides whether the template can be picked. The contract and deployment workflow still validate the selected token addresses and feature settings when you submit the asset.
Self-contained required features
These badges do not add a follow-up configuration step from the required-feature badge itself. Use the token feature catalog for the canonical behavior reference.
Current self-contained badges include Historical Balances, Voting Power, Permit, Transaction Fee, Transaction Fee Accounting, Fixed Treasury Yield, and Conversion Minter. Transaction-fee badges only create non-zero fee behavior when the template supplies fee settings; Fixed Treasury Yield only creates a configured yield schedule when the template supplies yield settings.
Configurable required features
These badges show follow-up inputs in the Asset Designer after template selection. Use the token feature catalog for canonical feature behavior; this table only lists the extra guided inputs.
| Feature | Asset Designer asks for |
|---|---|
| Maturity Redemption | Maturity date, denomination asset, face value, and redemption treasury. |
| AUM Fee | Management-fee basis points and recipient settings. |
| External Transaction Fee | External fee token, absolute mint, burn, or transfer fees, and recipient settings. |
| Conversion | Target token, denomination asset, discount, conversion window, debt handling, and related rules. |
Configure asset basics
Enter the core asset properties. The Asset Designer shows live character counters below text inputs and checks these values before you can continue, so use values that describe the exact instrument you intend to deploy.
| Field | What to enter |
|---|---|
| Name | Full asset name, up to 50 characters, such as "Acme Corporate Bond 2025". |
| Symbol | Trading symbol using uppercase letters and numbers. The field accepts up to 12 characters and suggests 3-12 characters for market-style use. |
| Decimals | Decimal precision from 0 to 18. Use 18 for standard ERC-20-style precision, 6 for USDC-style precision, or 0 for whole units only. |
| Jurisdiction | Country for the asset's regulatory jurisdiction. DALP submits this as an ISO 3166-1 numeric country code. |
When the symbol field is empty, the wizard suggests a symbol from the asset name. A one-word name uses the first five letters, a two-word name combines the beginning of both words, and longer names use an acronym. You can replace the suggestion before continuing.
Most asset classes also take a base price and a pricing currency here. Use the currency picker next to the base price to choose the fiat currency the price is quoted in. Type in the search box to narrow the list. The picker matches by ISO 4217 code, currency name, and country name, so you can find any option without knowing its code. Searching Malaysia or Malaysian Ringgit, for example, finds MYR. Matching ignores case and accents, and each entry is labelled Currency name (CODE) so you can confirm the right one before you select it. The picker offers a curated set rather than the full ISO 4217 list.
Maturity-bearing assets such as bonds are priced against their denomination asset, so they do not show the base price and currency fields in this step.
As you fill in the basics, DALP checks whether the asset is available and shows the result inline.
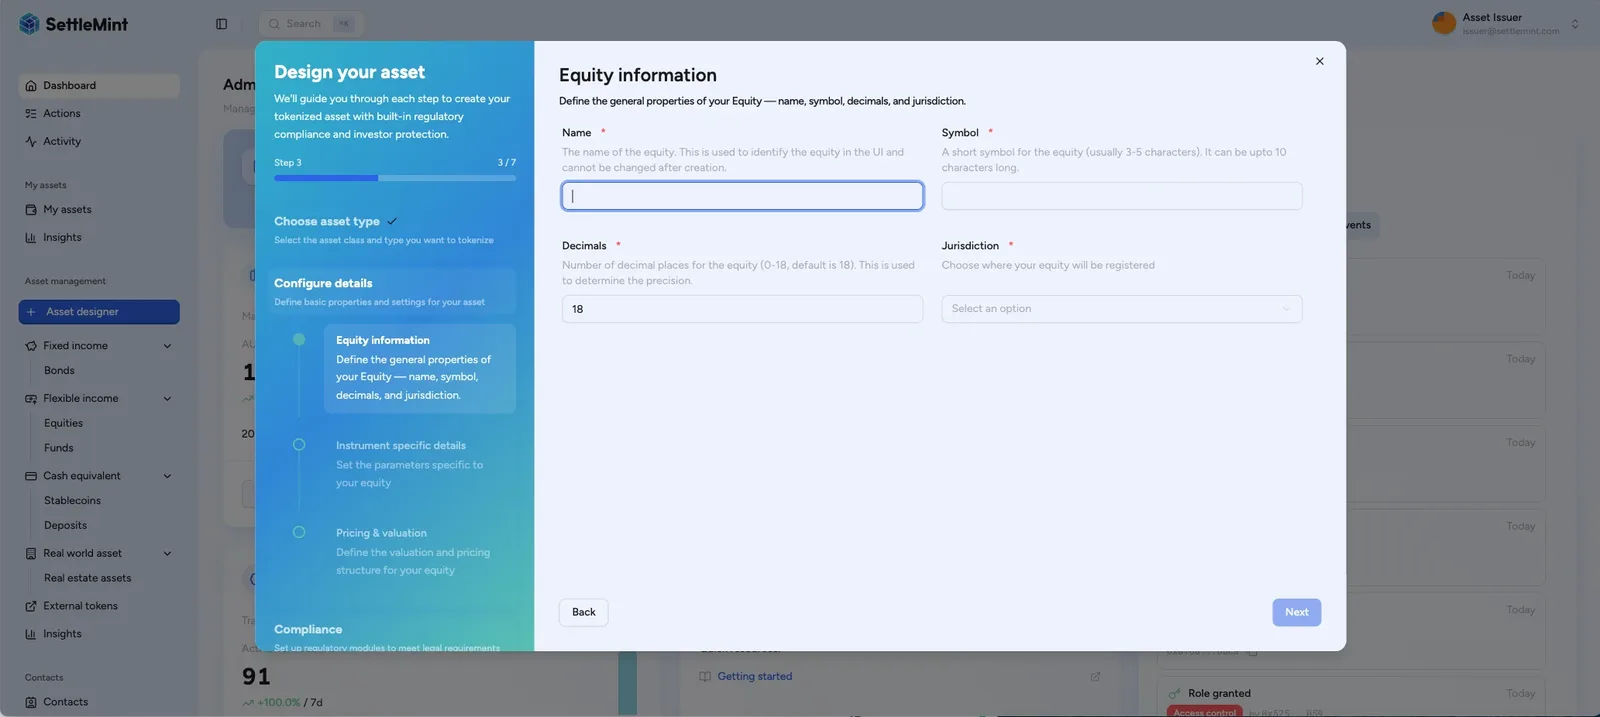
Asset uniqueness and the availability status
Within your organization, an asset is identified by the combination of its asset type, name, symbol, and decimals. You can deploy only one for any single combination, so reusing all four values points back to one you already created. Vary any single value and you describe a distinct asset. The same name, symbol, and decimals under a different asset type is also distinct, not a duplicate.
The availability status reflects that rule against the values you have entered. You can continue to the next step only when the status is Available. The Next button stays disabled while the status is Unavailable or Cannot verify, and the route guard keeps the basics step incomplete until the check passes.
| Status | What it means | What to do |
|---|---|---|
| Available | DALP found no existing asset that this combination would duplicate. | Proceed. |
| Unavailable | Your organization already has an asset with this exact combination. | Change the name, symbol, or number of decimals to a combination you do not yet use. |
| Cannot verify | DALP could not confirm availability, for example during a brief connectivity interruption. | Review the basics and wait for the check to run again. |
Changing the type, name, symbol, or decimals clears the previous result and starts a new check, and the same values feed the asset summary you review before deployment.
DALP also shows an inline duplicate-asset warning while you edit the basics whenever the name, symbol, and decimals already match one of your organization's assets of the same type. The warning is advisory and names the existing asset. It does not block the Next button. A duplicate that reaches deployment is stopped with a message naming the existing asset, and your inputs are kept. Return to this step, change the name, symbol, or number of decimals, and create the asset again.
Configure asset details
Complete the template-specific fields shown by the wizard. DALP inserts the details step only when the selected template exposes configurable required-feature inputs or metadata fields. Templates without input fields skip directly to pricing.
For a precious metal asset, this step records the metal metadata and terms: metal type, purity grade, vault location, custodian (all three are optional), weight unit, and weight per token. Price currency and base price are part of the asset basics. Use these fields to describe the digital metal program; keep assay certificates, storage receipts, insurance documents, and other backing evidence in your external operating records or token document uploads.
Choose compliance controls
The compliance step starts from a policy template rather than a blank list of modules. Under "Choose a Policy template", the wizard shows the published policy templates available to your organization, each labelled DALP Library or Organisation and tagged with its jurisdictions and the number of controls it carries. Selecting a template applies its full set of controls to the asset in one step, so most operators do not configure modules by hand.
You have three ways to set compliance here:
- Pick a policy template to apply a curated set of controls for a jurisdiction or program. Policy templates keep asset configurations consistent and match the controls your compliance team has already approved.
- Select No compliance to deploy the asset with no controls. DALP warns that holders and transfers will not be screened. You can still install compliance modules later from the asset's Compliance tab.
- Turn on Advanced configuration to build the control set yourself. The toggle reveals an enabled-controls list and an available-controls list so you can add or remove individual modules.
Individual compliance controls
Advanced configuration and the policy templates draw from the same set of on-chain controls. Each control is enforced automatically for every transfer.
| Module | Description |
|---|---|
| Identity verification | Requires both sender and recipient wallets to have a verified OnchainID with valid compliance verifications (e.g., KYC, accreditation). Wallets without verified identity cannot send or receive the asset. |
| Country allow list | Only wallets with an OnchainID issued in specified countries can hold the asset. Use for securities restricted to certain jurisdictions. |
| Country block list | Wallets with an OnchainID from blocked countries cannot hold the asset. Use for sanctions compliance or regulatory restrictions. |
| Address block list | Explicitly block specific wallet addresses from holding or transferring the asset, regardless of their identity status. |
| Investor count limit | Caps the maximum number of unique wallet addresses that can hold the asset. Useful for private placements with regulatory investor limits (e.g., Reg D 99 investor cap). |
| Time lock | Enforces a minimum holding period before the asset can be transferred. Investors must hold for the specified duration after receiving units. |
| Transfer approval | Requires an authorized approver to manually approve each transfer before it executes. Use for securities requiring transfer agent oversight. |
| Collateral requirement | Requires sufficient collateral backing before minting new units. Validates only minting operations, not transfers. |
When you apply a policy template, the asset must submit every control the template declares. DALP rejects the deployment when those controls are missing from the final configuration, or when a country allow list has no countries selected, because an empty allow list would block every transfer.
For more details on compliance modules, see the compliance overview.
Set initial asset permissions
Confirm which wallets should receive asset-level roles when DALP deploys the token. The wizard keeps your connected wallet in the permission list with the Admin, Governance, Supply Management, and Emergency roles, and you cannot remove your own entry. Together these let you run the first operating steps yourself after deployment: Emergency authorizes unpausing the asset, and Supply Management authorizes minting the first supply.
Use Add permission to grant another wallet one or more asset roles before deployment. Current asset-level roles include Admin, Custodian, Emergency, Funds Manager, Governance, Sale Admin, and Supply Management. Add only the roles each wallet needs for its first operating step.
Review and deploy
Review the selected template, asset details, compliance controls, and initial permissions on the summary page. The summary also lists the token-feature settings you configured, grouped under the instrument template, so you can confirm them at the last checkpoint before the transaction goes out.
For a convertible note, the summary includes conversion settings: the target token, the denomination asset, and the discount as a percentage. Confirm these before proceeding. They decide how holdings convert and are the highest-risk part of the configuration.
When ready, click Deploy and authenticate with your PIN or OTP to submit the transaction. After authentication, the platform broadcasts the deployment transaction to the network.
After you authenticate, DALP shows a live deployment progress screen. Each stage appears as a step in a timeline that updates in real time: deploying the token contract, granting permissions, issuing claims, and, when they apply, submitting the initial price feed and unpausing the asset. Steps that do not apply to your asset are not shown. Keep this screen open until it finishes. When every step completes, DALP takes you straight to your new asset's detail page.
Funding the wallet during deployment
On a network where gas is not free, deployment can stop and wait when the wallet you deploy from does not hold enough of the network's gas token to cover the transactions. Instead of failing, the progress screen shows a funding request. The request names the wallet address to top up, the network to fund it on, the smallest amount that clears the shortfall, and a recommended amount that also covers the rest of the deployment. The recommended amount accounts for every transaction the deployment still has to send, so funding it once is enough to finish in a single pass.
Send the gas token to the named wallet on that network. DALP watches the wallet and continues on its own once the balance is enough, with no need to resubmit or start the wizard over. You can dismiss the funding request to a small status indicator to keep the full progress timeline in view; reopen it any time to see the address and amounts again. A small over-send is harmless.
If a stage fails, the screen names the step that failed and shows the error with a reference you can copy. From there you return to the wizard with every input still populated, so you can adjust the configuration and submit again.
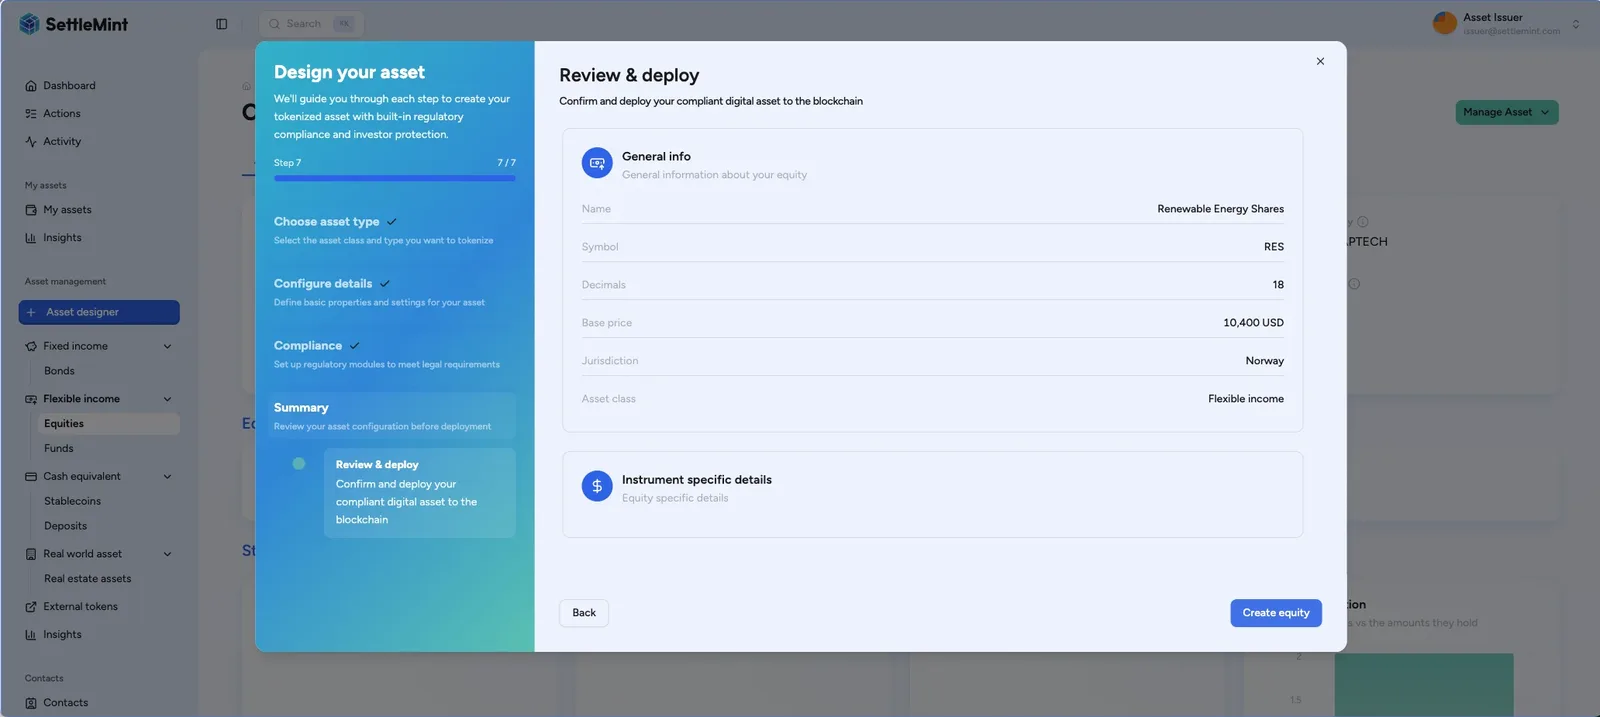
After deployment
Once all deployment stages complete:
- DALP takes you to your new asset's detail page.
- Your new asset appears under Asset management in the sidebar, listed under its asset class, such as Fixed income > Bonds.
- DALP grants the initial asset roles you reviewed in the permissions step.
- The platform issues pricing and classification verifications to the asset's identity.
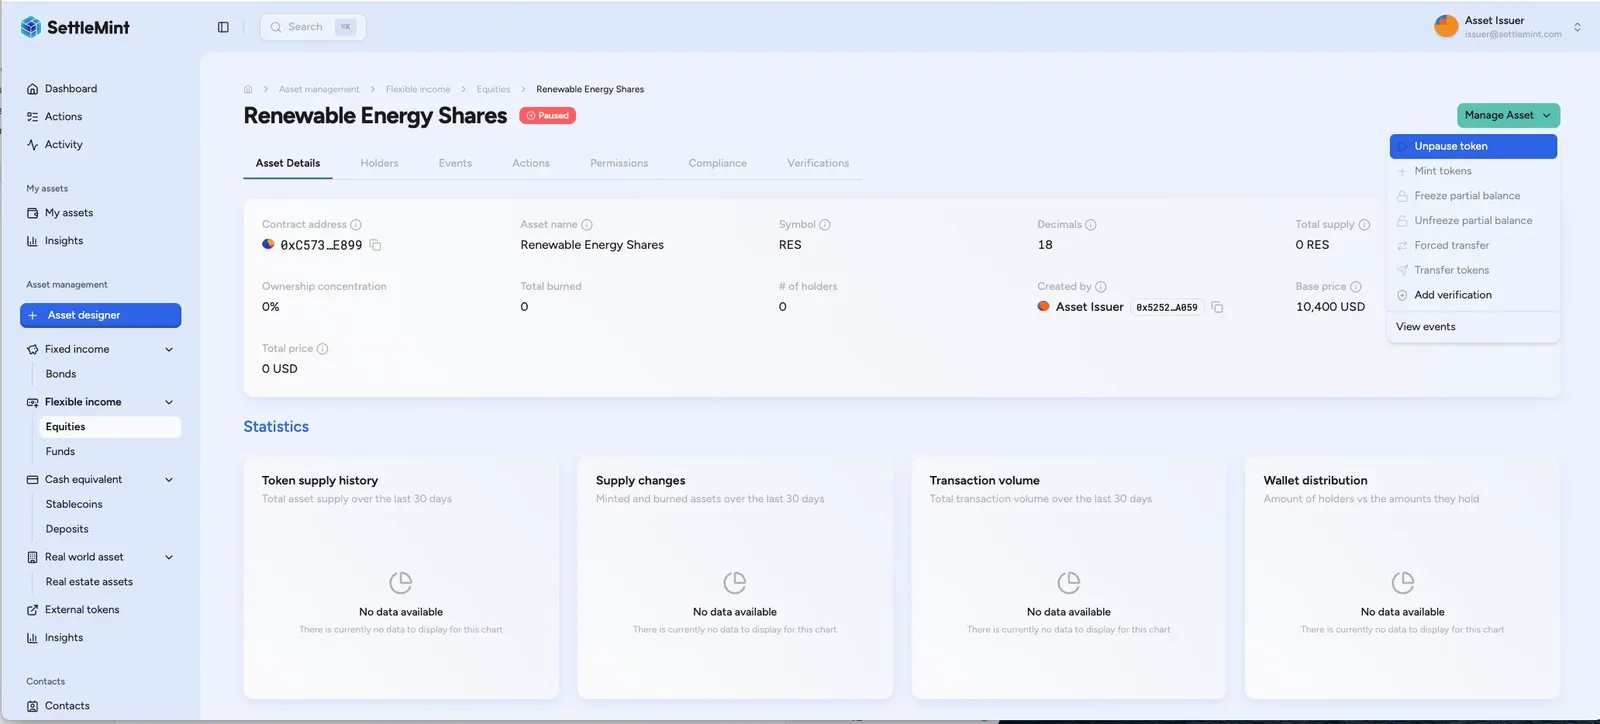
- The asset remains paused unless you selected the unpause option on the summary step during creation.
Activating the asset
By default, new assets are created in a paused state to allow review and final approvals before going live. This gives compliance teams a review point before any units are issued.
If your operating process allows launch-time activation, select the unpause on creation option on the summary step before deployment.
To activate the asset:
- Navigate to the asset detail page under Asset management in the sidebar
- Click Manage Asset and select Unpause
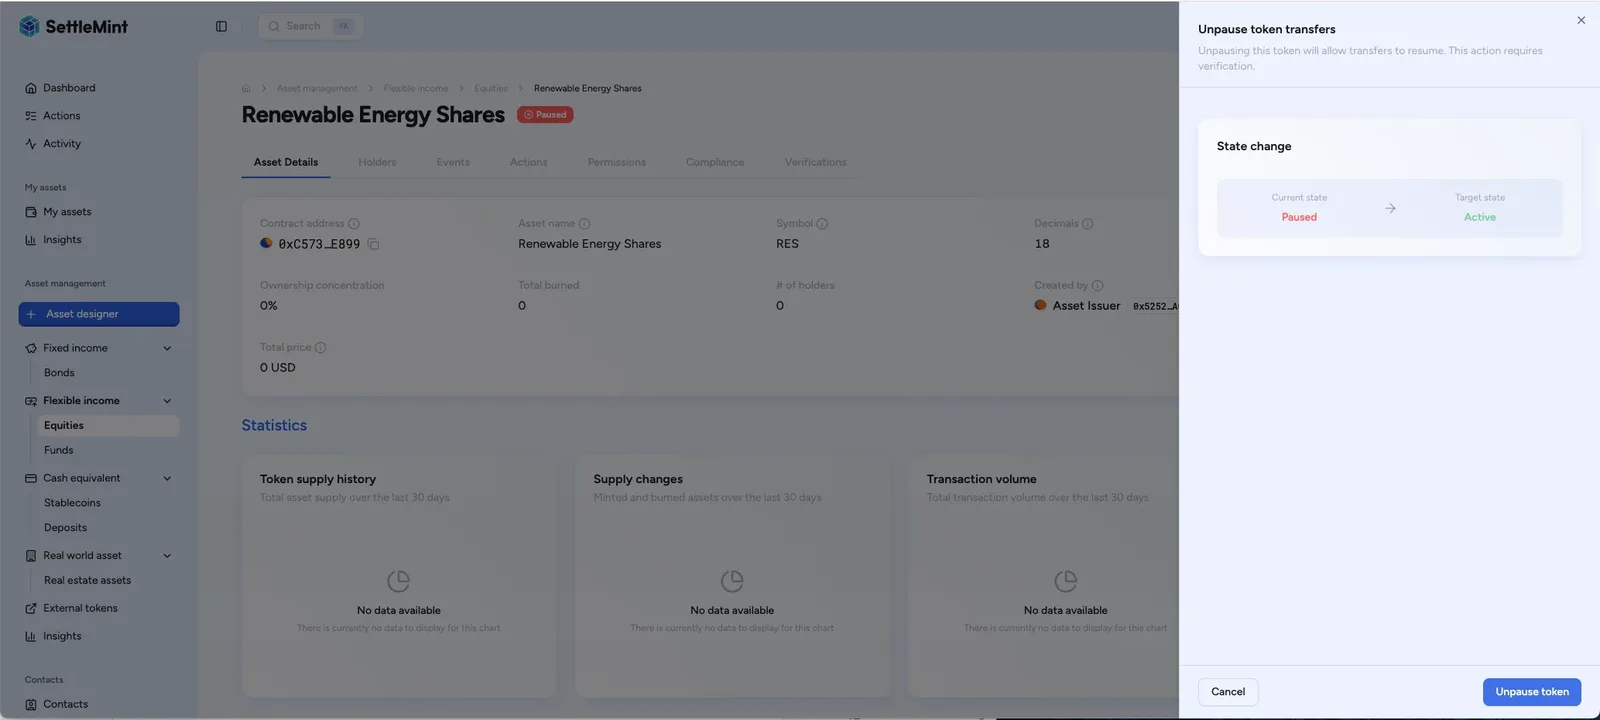
- Authenticate with your PIN or OTP to confirm
You created this asset, so your wallet already holds the Emergency role that authorizes unpausing. You can run this step yourself, without waiting for another administrator.
Once unpaused, authorized users can begin issuing the asset to investor accounts.
Troubleshooting
| Issue | Solution |
|---|---|
| Create Asset button disabled | Verify your account is onboarded and has permission to create tokens for the system. The wizard redirects users who do not have that permission. |
| Instrument template not available | Use Select instrument template to choose a published template for the chosen asset class, or ask an administrator to publish one backed by a usable token factory. |
| Deployment fails | The deployment progress screen names the stage that failed and shows the error with a reference you can copy. Confirm wallet verification is configured, then return to the wizard from the failure screen to adjust the configuration and submit again. On a network where gas is not free, a wallet that runs short of the gas token does not fail the deployment: it pauses and waits for funding, as described under Funding the wallet during deployment. |
| Deployment waiting for funding | On a non-zero-gas network, the deployment paused because the deploying wallet is short of the network's gas token. Send the gas token to the wallet address shown on the progress screen, using at least the recommended amount, on the network the screen names. DALP resumes the deployment automatically once the balance is enough. |
| Asset already exists | Your organization already has an asset with the same type, name, symbol, and decimals. Change the name, symbol, or number of decimals on Configure asset basics until the asset is available, then continue. If the message appears at deployment instead, return to the basics step from the failure screen and change those values; your other inputs are preserved. |
| Missing template feature inputs | Confirm the selected published instrument template is linked to a usable token factory and includes the required feature configuration. |
| Missing compliance options | Use Choose compliance controls to confirm the needed compliance rules are selected and configured for the asset. If you applied a policy template, every required control must appear in the final configuration. |
| Empty country allow list | Add at least one allowed country, remove the country allow-list control, or choose a different compliance template. An empty allow list blocks every transfer, so DALP rejects it before deployment. |
Configure collateral backing requirements for assets
Configure the collateral compliance module so DALP checks the asset identity for a valid collateral claim before minting more supply.
Instrument templates in DALP: build and reuse asset blueprints
Create, reuse, and publish instrument templates for the Asset Designer.